Tag

Showing blog posts sorted under the tag: raspberry pi

Feedback Kiosk Using Raspberry Pi Pico W

Have you ever seen those kiosks at airports with smiley-faces on them? As you walk by, you hit a big button to express how you feel at the time. Well I was looking for a reason to play around with the Raspberry Pi Pico W, and thought that trying to recreate my own version of one of these would be a fun project.

The whole system is split into two parts: the physical kiosk, and the server backend/frontend. The physical kiosk connects to WiFi, logging all button presses both locally and sending them to the server backend. There's also a nice little web frontend to see some daily statistics on which buttons are being pressed.

The Kiosk

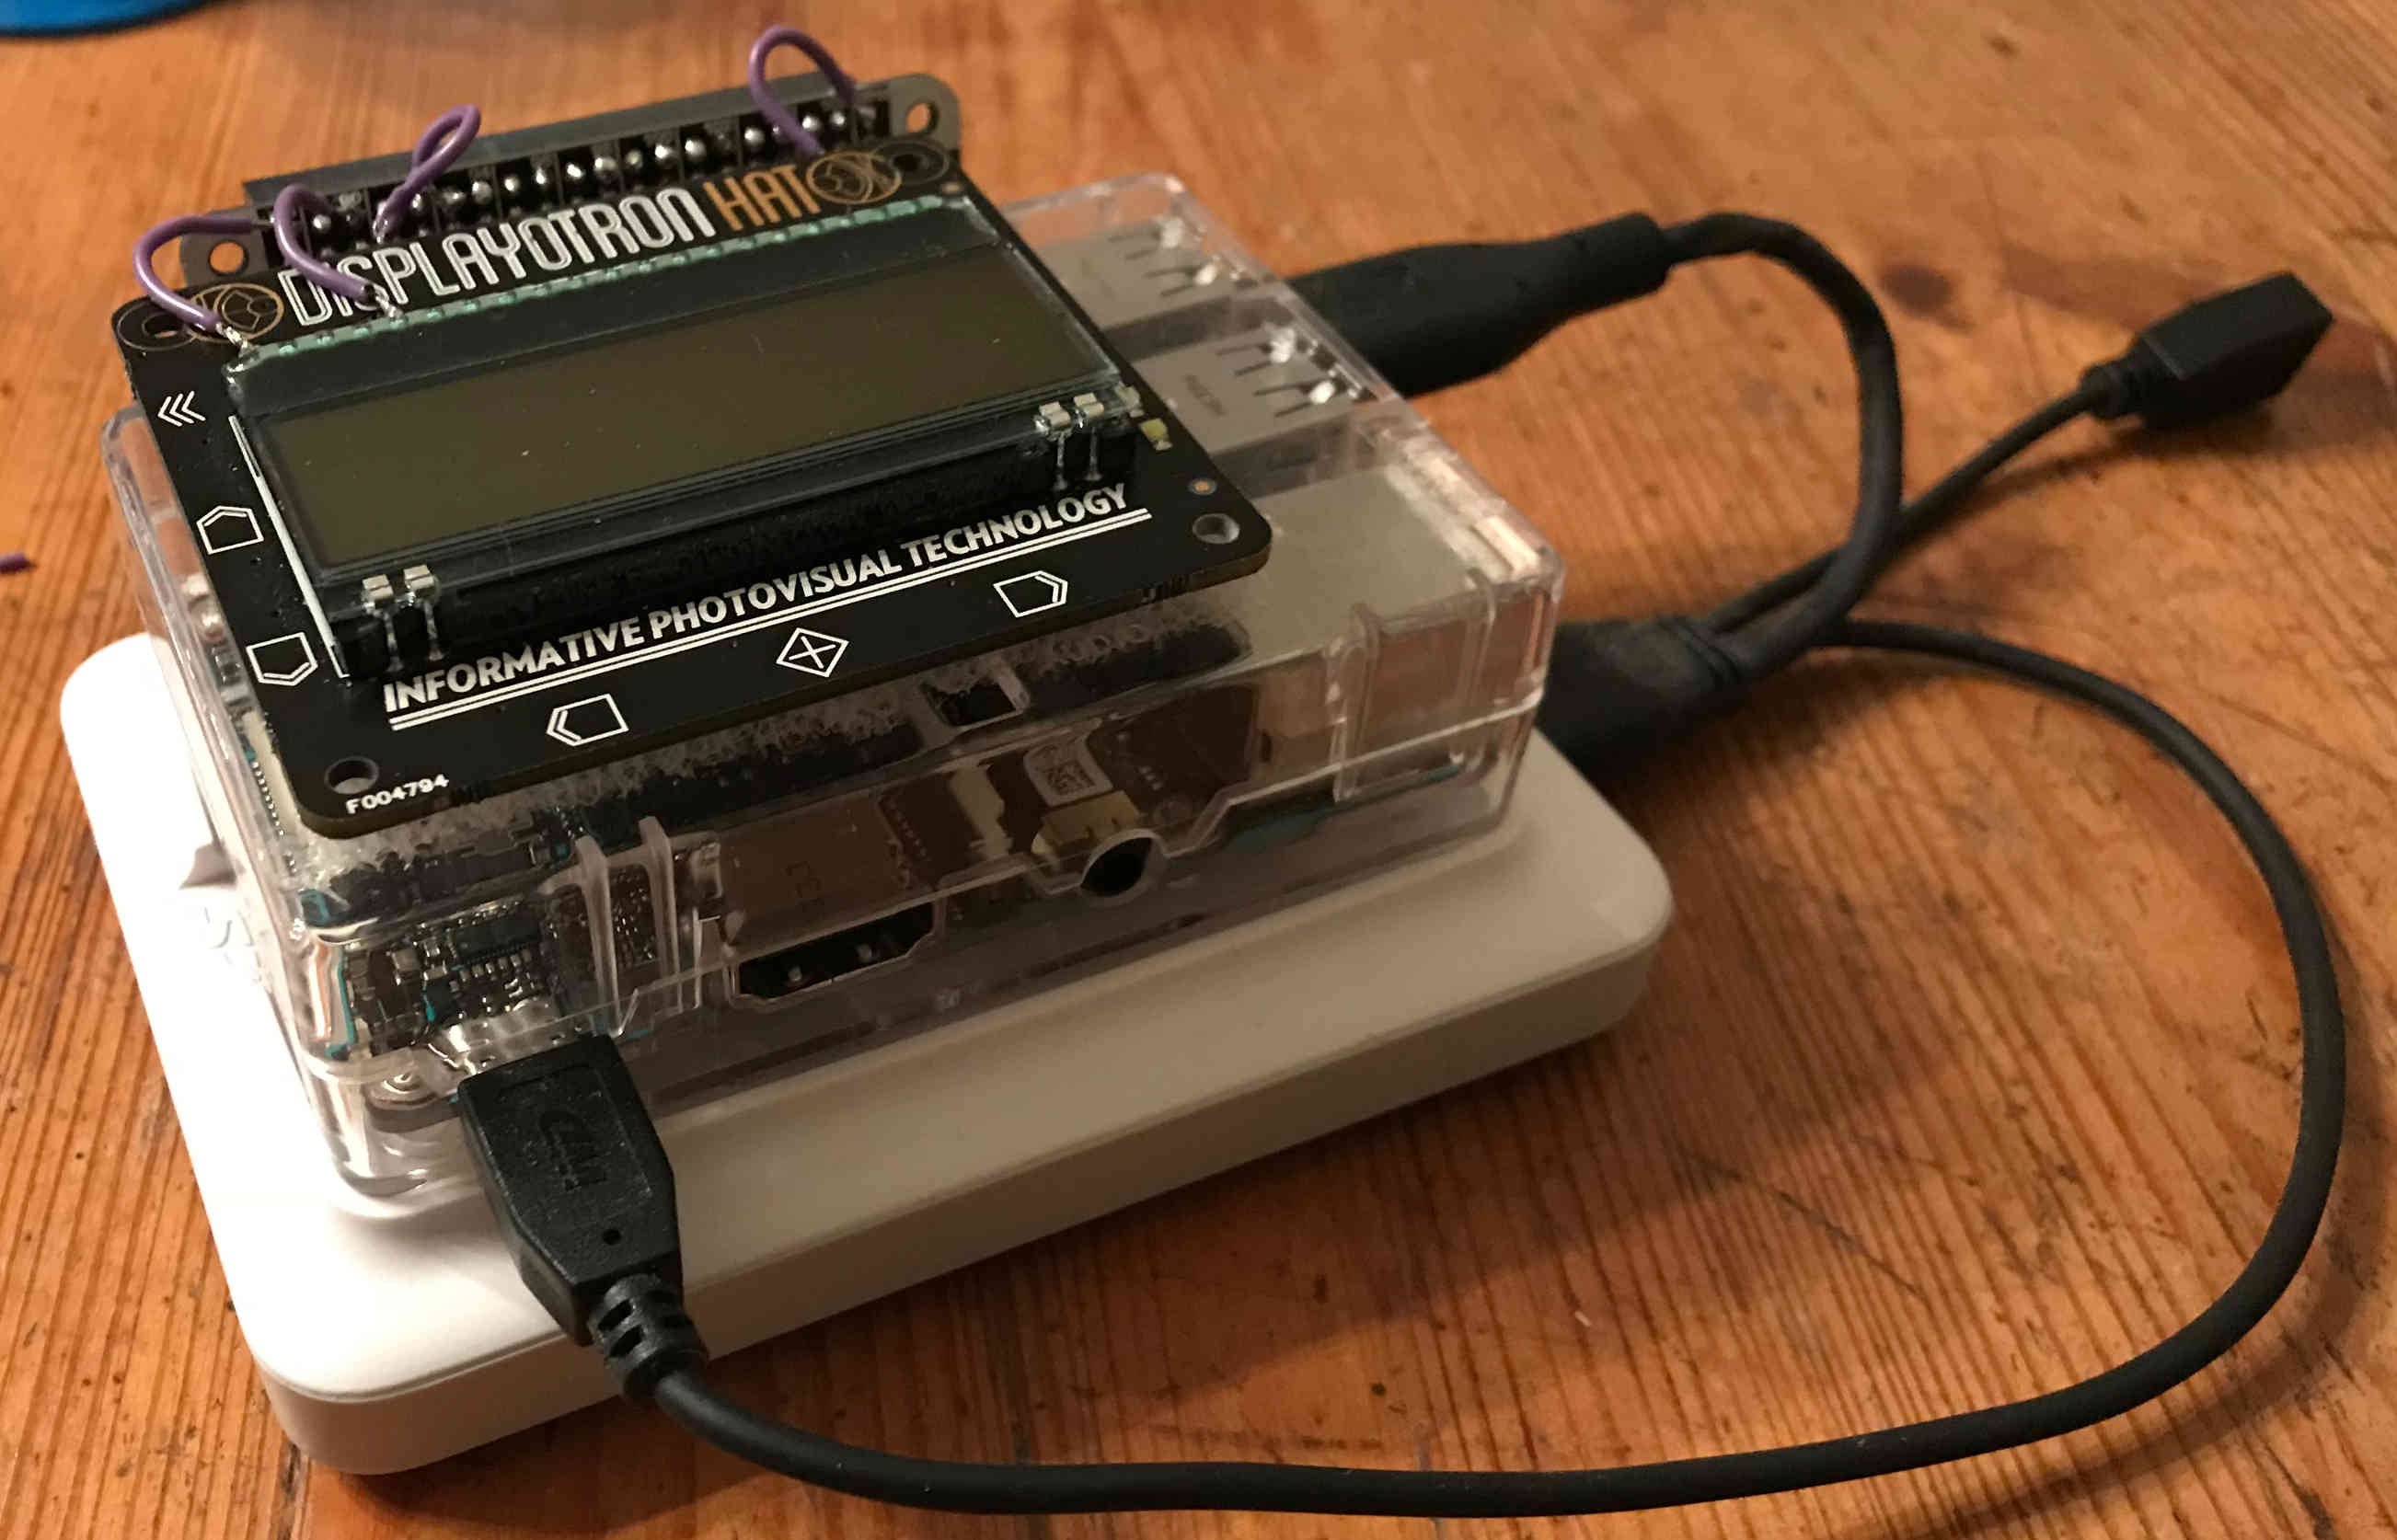
The Feedback Kiosk box and its internal wiring.

The brains, and main component, of the kiosk is a Raspberry Pi Pico W but to get all the features I wanted, I also included the Adafruit Adalogger. The Adalogger is a combo real-time clock and SD card adapter for the Pico essentially built for logging, exactly what is needed for the kiosk. Aside from those, I also picked up a few large push buttons off Amazon and a small wooden box from Walmart. I think the push buttons are targeted at people wanting to make their own Pop'n Music controller, but they worked well for this project.

The basic operation of the kiosk is pretty straightforward. It constantly waits for button presses and, when it detects a press, logs it locally to the SD card and uses WiFi to send it to the server for safer keeping. One of the cool features of the Pico is that it is multi-core. So, one core can constantly check for button presses while the other can handle the logging and HTTP requests. This has the advantage of the main loop never getting blocked by slow WiFi and we never miss a button press.

Another interesting feature I built into the kiosk is a simple webserver that allow users to change the WiFi connection settings. If the kiosk can't connect to a WiFi hotspot, it starts itself as its own access point. Connecting to this access point from a smartphone takes the user to simple webpage where they can supply an SSID and password. Pretty handy when moving it between different locations.

Alternatively, the kiosk can be started in offline mode by holding down the red button on boot. This will only log to the SD card and not try to use any wireless features.

The Server

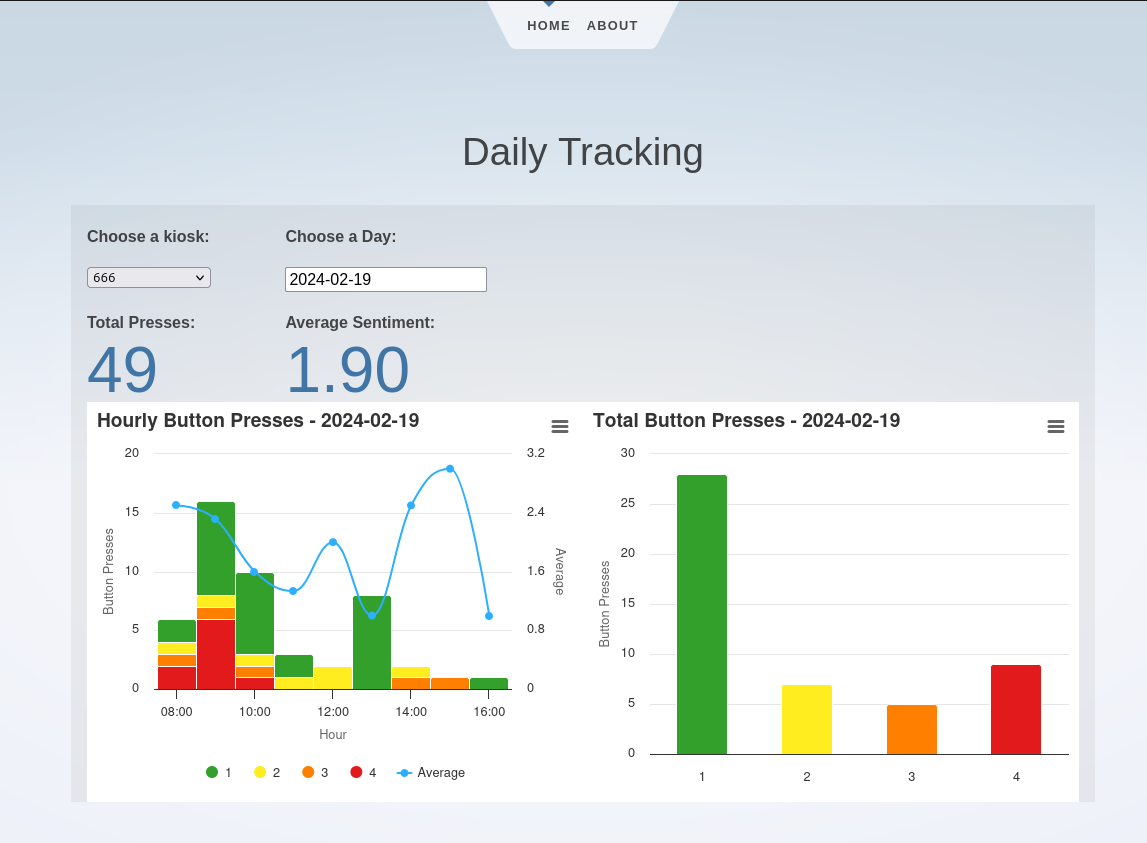
Screenshot of the Svelte webpage to view daily button presses.

For the server backend, I wanted to try programming something new decided to try writing it in Rust using the Actix web framework. I don't think this project was really large enough to get a good grasp on Rust, but it was a nice learning experience for sure. Normally, I would have used C and bittyhttp for a small project like this.

One thing I liked with Rust was its great package manager and compiler. It made it very easy to get whatever libraries I needed and statically cross-compile the whole application into a single executable. Then I could simply copy it over to the server actually running it. I know this is possible with other languages as well but Rust's package manager and compiler just made it so easy I really appreciated that.

Currently, there are only a few endpoints built into the backend: one to receive button presses, one to send back all button press data (for the frontend), and another to send the current time information to kiosk which is handy for setting the RTC.

As for the frontend, I stuck with Svelte, which I have use for several projects in the past. For simple cases like this one, I find that it makes things very easy and quick to get the behaviour that I want. My favorite feature of Svelte though is the ability to compile everything to static pages, meaning I don't need any other server components running aside from the backend.

Closing

Although this whole thing is very much a prototype, I think it would be really fun to deploy the feedback kiosk somewhere that is busy enough to get a lot of data. I'd really like to see how people's mood changes throughout the day, or even throughout a week.

Code for this project is also available on GitHub: https://github.com/cluoma/big_button

Thanks for reading!


Tags:


Detecting Northern Lights using Raspberry Pi and Convolutional Neural Network - Part 1

Pi Camera and a Northern Lights image with prediction.

At the moment, I'm fortunate to live in a part of the world where visible Northern Lights are fairly common. The problem is though, they may only show up for a few minutes during the night so you have to either be a real night-owl or get lucky. I wanted to build something to help me catch the Northern Lights more often.

The idea mostly came after seeing the recent release of the Raspberry Pi camera module 3 and wanting an excuse to do something with it.

In this blog post I'll go over the proof of concept of the idea and how I hope to develop the project into something a little nicer.

I already had a bit of a head-start on the some of the infrastructure from a previous project of mine, a Raspberry Pi baby monitor. It's a two-part setup a camera-equipped Pi Zero W and a separate server component running on my home server. The Pi Zero is a 'dumb' piece that only takes pictures every few seconds and sends it via http, while all the business logic of collecting, storing, and displaying pictures sits on my server. This makes it easy to unplug and move the camera around without causing too much trouble to the whole system's operation.

For this particular project, my Pi Zero got a camera 3 upgrade and was pointed straight at the sky out my north-facing, upstairs window. It captures a picture every 5 seconds and sends it to my home server where it's stored for later; most nights capturing about 7000 images. Each image is stored in a folder and metadata about the image is written to a small sqlite3 database. To label the images, I was able to use my computer's image previewer to quickly scrub through a nights worth of images and mark them in the database as either containing Northern Lights or not. It only took about 30 minutes per night but it was pretty boring work none-the-less.

With labelled images, I could sort them into a proper training dataset of 'aurora' and 'sky' pictures. I then trained a large convolutional neural network built using the Keras Python package to classify the pictures. The Keras documentation has a nice article called 'Image Classification from Scratch' which was a good starting point for this task. It shows how to build a model to classify pictures as either dogs or cats, so it was fairly straightforward to adapt it to the task of classifying 'Aurora' or 'No Aurora'.

Below is a YouTube video showing a full night of particularly active Northern Lights. The 3rd number in the top-left of each image is the prediction from the trained neural network, the closer to 1 the number is the more confident the model is that the picture contains Northern Lights. None of the pictures in this timelapse were used in training the model. Skip ahead to 0:50 to see the Northern Lights in action!


With the concept proven, I'd like to build the whole project out a little bit more. The step 2 is to build a proper webapp that can receive pictures from the Pi, classify them, and display them. The best pictures (according the model) will get saved, and on really good nights it should send me a text message or some other notification. It will probably be a bit tricky to come up with a good heuristic for this, as sometimes Northern Lights will be gone within a few minutes.

Step 3 is to build a better enclosure for the Raspberry Pi so that I can move it outside to a more permanent location. I'm more of a software person so I haven't thought too much about this. If anybody has any god suggestions please let me know.

That's it for now. Thanks for reading. I'll try to put the code and training pictures on GitHub soon.

Update

I've been playing a bit with Google Colab and thought it would be a good way to share the training code and data for this project.

Python Notebook: https://colab.research.google.com/drive/1CFNfKZH_WyrGN71t4Jx4NU-FzBTAeZP5?usp=sharing

Training Images (1.4GB): https://drive.google.com/file/d/1N8uuIMo6AzM6SGoTBQh7iWK_SGIOyh6n/view?usp=sharing


Tags:


Building a Video Baby Monitor with a Raspberry Pi and Wt

How it looks on the Raspberry Pi LCD touchscreen.

There are a lot of baby monitors out there on the market. But none of the ones with video really seemed like a good fit for us. Most either work over wifi, in which case who knows where else that video is going, or talk directly to a monitoring device, which then means keeping track of and charging another thing. I thought I could do a little better.

The task seemed straightforward enough: somehow get pictures from a camera pointed at the baby, onto my local Raspberry Pi server, where they could then be viewed by anybody with a web browser on the LAN. This way, everything stays local to our home network and we could use our smartphones to check in on the little sleeper.

I tackled the receive image and show it on a webpage side of the project first. For this I used the Wt C++ toolkit. Wt is kind of like Qt but for the web. It makes designing layouts and interfaces like building any other GUI app. It's also possible to create REST endpoints using Wt. This meant I was able have the ability to receive an image and have the viewing interface in the same application. This simplified things a lot since all the business logic could be placed in a single executable.

One cool side-effect of working with pictures is that it makes creating timelapses, like the one below, extremely easy. Watching a full night timelapse can then be pretty entertaining to see exactly how the little one ends up in such weird positions. Sometimes, the baby is most definitely not how you left it.

Timelapse shot using a few frames.

The second piece, the camera, is built from a Raspberry Pi Zero W with an infrared camera and a couple of IR LEDs, all mounted to a mini-tripod. All the camera does is take pictures every few seconds and send them to the local server, running the Wt application, via an HTTP POST request. Because all the important logic is in the Wt application, the camera unit itself remains relatively dumb. This is important so that the camera can be unplugged or moved without affecting the viewer application. No need to worry about pulling the power cord whenever.

Any web browser on the local network can access the viewing page. In practice this usually means a smartphone, but also sometimes another browser window set to 'always on top' when on a PC. The viewer shows the most recent picture it received and the timestamp that it was taken. The timestamp is important so it is easy to tell if something has stopped working. The viewer will also push the newest image over websockets to the browser and update itself without having to do any page reloads.

Overall, this turned out to be one of my more useful household projects. Both my wife and I have been using it to keep an eye on the little one while napping or in the evenings during bedtime.

Check out the full code on GitHub if you're interesting in the specifics.

I should also note, that this isn't - and shouldn't be - used as the main source of monitoring a child or baby. Our apartment is rather small so we are always in earshot. This is not a safety device! It's simply to check in on how the little one is sleeping.


Tags:


Mini Review - Conrad Raspberry Pi Advent Calendar


Please note: this article contains spoilers of the contents. Don't read this review if you plan on buying this product.

Living in Germany, there are a lot of choices when it comes to Advent calendars. Of course, there are lots of styles of chocolate calendars, but also calendars with beer, tea, Lego, and even a 'couples' calendar from the local drug store. One of the more interesting themes was a Raspberry Pi Advent calendar from Conrad.

Conrad is a chain of electronic stores in Germany that sell a lot of classic electronic bits. All the small things you typically associate with electronics: resistors, buttons, etc. They also have a decent selection of Raspberry Pi products, one of them being an Advent calendar. Naturally I couldn't resist and decided to get one for the holidays.

So what do you get for your 29EUR? Well, there isn't much to say about the presentation of the box itself. It looks like a typical calendar with 24 doors, one for each day in December leading up to Christmas. They're all well separated into small compartments so you won't see anything from other doors while opening each one. You also get a large cardboard nativity-scene cutout so you can probably guess what final project will look like. It's also worth noting that it doesn't contain the Raspberry Pi itself so you will need to supply your own Pi as well as a keyboard, mouse, and screen.

Each little door contains a few electronic bits that you will use the day's project. The variety in parts is pretty limited and most days there won't be anything except cables. I think the last 4-5 days opening doors was nothing but cables which was really disappointing. Even the larger doors that allude to something more interesting just contain cables. This was probably the biggest disappointment of the calendar. That said, there were some slightly more interesting pieces like a couple of tri-color LEDs that get used for some neat effects.

The programming is all done using a visual language called Scratch. You can build simple programs using basic visual blocks that represent things like loops and if-else statements. For basic things it works alright but programs can quickly grow very large and they become difficult to work with. By the end of the calendar the programs were so large that my wife and I stopped doing everything ourselves and just used the pre-made ones.


The included instructions are only in German but several other languages are available online. Beware, the English instructions are badly Google translated. My wife and I had to refer to the German instructions several times to clear things up. Annoyingly, all versions of the instructions contained some very obvious mistakes. On one day the project diagram showed all wires going to ground. If this is somebody's first experience with electronics then stupid mistakes like this can be really frustrating.

I would stay far and clear from this calendar in the future. There are just too many negatives between the instructions contained mistakes, the programming language being difficult to work with, and the disappointing amount of components.


Tags:


A New Year - A New Server


There's one guaranteed way to a good start to the new year: new computer hardware! Previously I had been hosting this site on an aging Raspberry Pi 2 and it was due time for an upgrade.

As much as I wanted to stay in the Raspberry Pi ecosystem and move to a Pi 3, Asus' Tinker Board sounded too good to pass up. Its biggest advantage over the Pi is a dedicated Gigabit ethernet adapter, perfect for a webserver. The Raspberry Pi shares its ethernet with the USB circuitry which means slow Megabit speeds. It can also quickly become saturated when reading data from an external USB drive and using the network at the same time.

Moving to new hardware also surfaced some bugs in minihttp so it was nice to further improve the server code as well. So far everything has been running great and I'm really pleased with the speed.

And of course, it's fitted with a new LCD display and a speaker. Similarly to the old server, the LCD cycles between temperature, CPU usage, and website hits. The speaker is set to play a chime whenever somebody uploads an image to our family picture frame.


Tags: